Mac Device
How to connect your Mac Device with Jabra PanaCast 50
Depending on the room setup of your meeting room, there are three different connection options with the Jabra PanaCast 50.
1. Connect with Jabra PanaCast 50 Room System MS
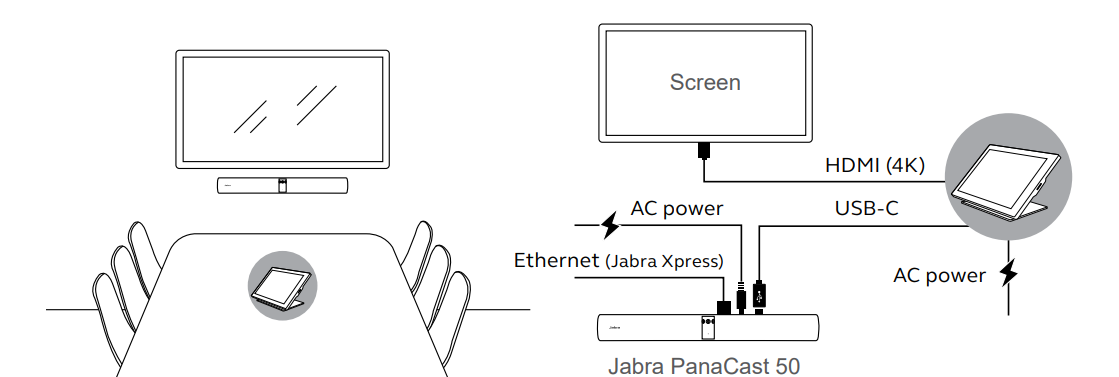
Ensure that Microsoft Teams is installed and launched on the control device
If required: Sign in to your Microsoft Teams account on the control device
Note
Microsoft Teams/Microsoft Teams Rooms should automatically detect and set the Jabra PanaCast 50 as the default video and audio device.
Warning
If the Jabra PanaCast 50 is not detected automatically, you have to set it manually as the default video and audio device in Microsoft Teams or Teams Rooms by following the Steps below:
1.1 Manually setting the Jabra PanaCast 50 as default audio and video device
- Launch Microsoft Teams or Microsoft Teams Rooms and sign in
- Click your account profile icon in the top right corner of Microsoft Teams
- Select Settings to open the settings menu
- Select the Devices tab in the menu list
- Select Jabra PanaCast 50 under Camera and Audio devices
- Start or join a scheduled meeting
2. Connect with Lenovo Docking Station
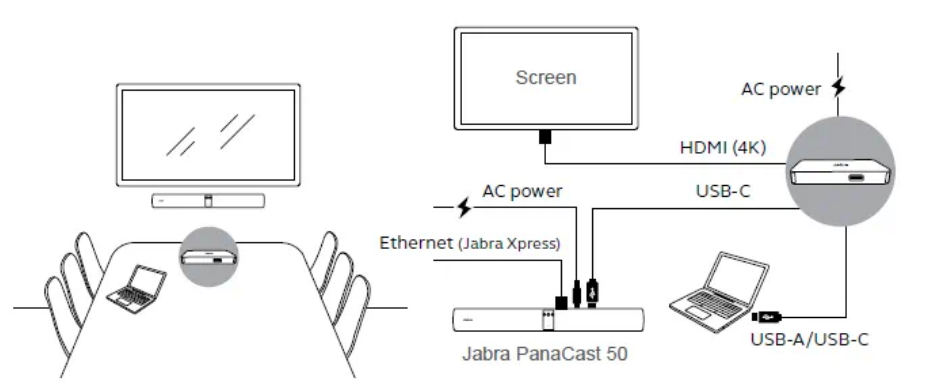
- Connect your own Device with the Lenovo Docking Station via USB-A / USB-C
- Start or join a scheduled meeting from your own device
Info
If the Jabra PanaCast 50 is not detected automatically, you have to set it manually as the default video and audio device in Microsoft Teams or Teams Rooms by following the Steps in 1.1!
3. Connect directly with your own device
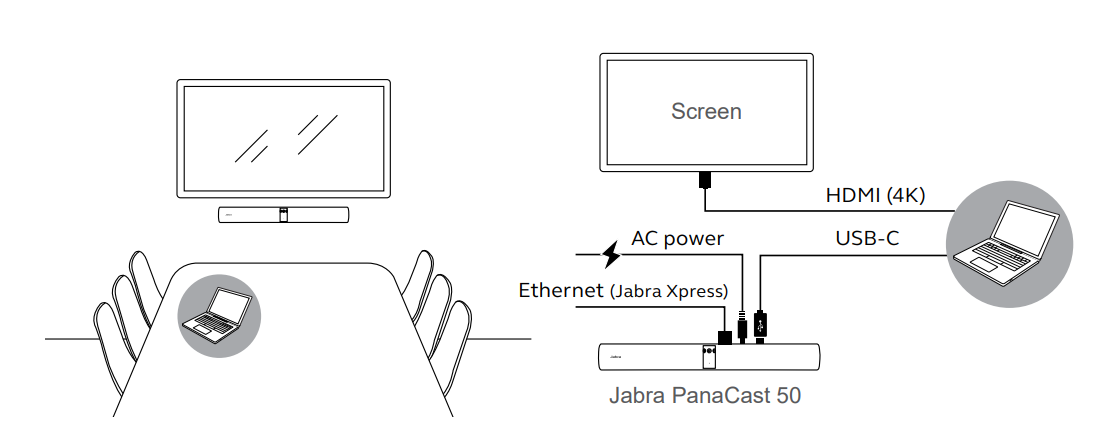
- Connect your own Device with the Jabra PanaCast 50 via USB-C
- Start or join a scheduled meeting from your own device
Info
If the Jabra PanaCast 50 is not detected automatically, you have to set it manually as the default video and audio device in Microsoft Teams or Teams Rooms by following the Steps in 1.1!
How to connect your Mac Device with Clickshare
Connect a ClickShare Button to your Macbook's USB port
The LEDs of the button start flashing white. A new drive is displayed on your Macbook. Two situations can occur:
Info
If the button is not recognised, please check whether the virus scanner is blocking the device. This may have to be deactivated.
If no start-up program is preinstalled
Open the ClickShare application on the newly recognised removable storage device by double-clicking on it
The ClickShare client software starts and the software icon appears in the system tray.

If the start-up program is already installed
Clickshare should be immediately available.
Press the button again to transfer the screen. The LEDs of the button now light up red.
Info
ClickShare automatically scales the content of your screen to the resolution of the monitor in the meeting room. The aspect ratio has been maintained to ensure correct proportions.
How to disconnect
Press the button until the LEDs start to glow white.
Now disconnect the button from your notebook.